
Are stretching and foam rolling leaving you with temporary improvement but no sustainable change? An easy way to answer this is to quickly reflect on your accessory routine and decide for yourself if it has done anything for you. Chances are that science does not support the way that you stretch or the way that you are using a foam roller to achieve your desired increased net tissue mobility. However, you are in luck!, there are many things that you can do to work towards remodeling tissue and achieving results that ARE supported by science. At The Center of Movement, our method includes 4 steps in this order:
- Decompress – A breathing practice that supports a solid, braced core. We usually will do this non-weight bearing to start, in a position that we eventually want to load in weight-bearing. Becoming more aware of our central control & stability allows for more power output from our shoulders, hips and other distal joints.
- Lengthen – A stretching practice for lengthening chronically shortened tissue, restricting a desired movement. This is typically some form of proprioceptive neuromuscular facilitation (PNF) stretching. Our goal is to isolate a tissue, and build tension and length in that tissue without compromising the integrity of surrounding structures.
- Control – The power of habit. Sometimes our movement patterns get so far out of wack with our daily routines that these patterns are then carried over into our rehab, accessory work and strength programs. In this section our goal is to reset specific movements by grooving healthy and safe patterns that we can feel confident putting under load.
- Load – Once you have done the necessary prep work we can begin gradually loading this movement before performing your working sets. This should be as simple as adding some light resistance to the desired movement (lunge, squat, deadlift etc.)
This week we will show you the necessary prep work using our method for optimizing the reverse lunge.
- Decompress – lay supine on the edge of an elevated surface with knees and hips bent in a 90/90 position. Lightly press feet into wall, & find neutral spine (avoid rib flare). Extend at the hip joint and return to 90/90 position. Repeat 8-10 times per leg.
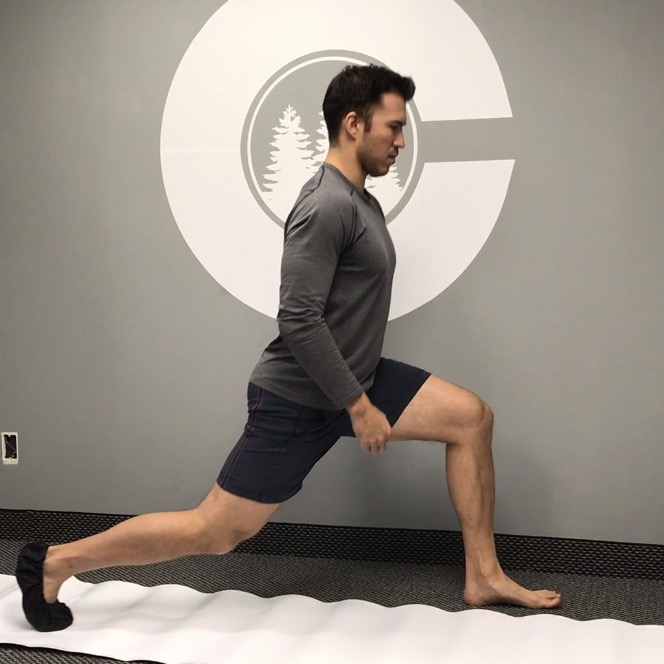
- Lengthen- get into a kneeling position, with the back leg, achieve isolated hip extension putting a stretch on the anterior chain on that side. When max isolated extension is achieved, scissor the tension between your front leg heel and your back leg knee. Hold this tension for 12-15sec. Relax the tension and see if you can rock forward into a deeper hip flexor stretch. Repeat on the other leg3.
- Control – place front leg just outside of the slide board, planted and back leg on the slide board. Maintain a strong neutral position with your spine and slowly hinge backwards into a reverse lunge position. make sure this movement is slow and controlled, about 4 seconds down and 4 seconds back up. Majority of your weight should be in your front heel to reality activate the posterior chain. Keep front knee bent at about 90 degrees and don’t let the front knee track over the front angle at any point during this exercise. **If you do not have a slide board you can use a furniture slider on your back leg on carpet, or a towel on your back foot on a hardwood/tile surface.
- Load – Grab a light kettle bell and begin to load the movement you grooved in the Control section above. When you hit the bottom of your reverse lunge, activate the front leg glut and spring back up to a standing position. Repeat and slowly increase the weight while maintaining the integrity of the exercise.
21,023 Comments